Wallboard noun
: a screen or web page designed to be shown on a tv/display mounted in a call center. It provides real time stats that are easily view-able.
The Background
My company has never had a real wallboard – we’ve shown the built in UCCX real time statistics page on a projector in the past, but it’s always been a low rent affair. So, as part of a new new system install, I was asked to integrate with the site’s wallboard. It turns out that their wallboard was just a plasma TV displaying some queue and agent stats. I think we can do this.
So, I began researching free wallboards that would work with my Unified Cisco Contact Center Express (UCCX) call center. There are a number available, including a nice one from Tenox, as well as the Free of charge Wallboard 2.4. I liked the Free of charge Wallboard, but it was broken for UCCX 8, and had a pretty dated look, so I decided to update this wallboard, making it compatible with UCCX 8 and up, as well as giving it a significant face-lift.
A new free UCCX wallboard is born
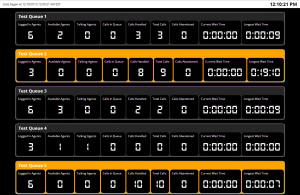
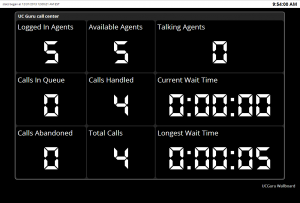
On to the good stuff, a description of this free to use Cisco call center wallboard. Let’s start with some of the screenshots of what the system looks like:
You can show multiple CSQs (customer service queues) on one screen
Or you can focus on only one CSQ
You can also show summary CSQ data

About the UCGuru.com Wallboard
This wallboard is free to use. As mentioned before, I am not the original author, however I’ve done a number of updates and modifications to the script, and think it looks and works quite nicely. Some key features:
- It’s free!
- All configuration data is stored in a single commented file – it’s easy to see what need to be changed.
- Updated style – most styling (the look and size of elements) is stored in a css stylesheet.
- Works with UCCX 8 – 10 – this is reason enough to use this script (in my book)
What is shown on the display:
- Logged in Agents
- Available Agents
- Talking Agents
- Calls in Queue
- Calls Handled
- Total Calls
- Calls Abandoned
- Current Wait Time
- Longest Wait Time
What do the different colors mean (gray / yellow / red)
- grey – if you have available agents then the row containing your queue will show as grey
- yellow – If you currently have no available agents (no one logged in, everyone talking, etc) the row will turn yellow
- red – calls are holding in the queue for an agent to become available.
Installation
The overall idea is that you will have a windows server that will connect via an odbc connection to your UCCX server. To view the wallboard, a client pc or wallboard machine will simply view the windows server default website.
Here’s how I did it:
- Create a windows server (I used a virtual machine). I found it easier to use the 32 bit version of windows, since UCCX will only use the 32 bit Informix drivers.
- Install IIS on the Windows server, and include ASP. Once installed, go to the IP of your Windows server and make sure that you see the default IIS website.
- Download and and extract the UCGuru.com Wallboard (link at the bottom of this article). Put these files in the default directory of your IIS install (usually C:\inetpub\wwwroot).
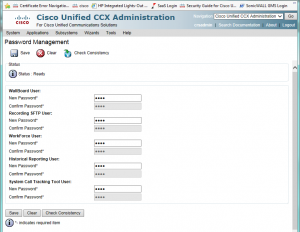
- On your UCCX server, you’ll need to know the uccxwallboard user password. I had no idea, so needed to reset this. Just go to Tools -> Password Mangement and change the password for the Wallboard User. Do not use Special Characters like &!”$£, as it won’t work. You’ll need to do this (and make the passwords match) on both servers if you have an HA cluster. Note about wallboard users – Cisco specifically recommends not using the uccxhruser, as it can cause high CPU utilization, so to stay on their good side, we’ll use the wallboard users and forego any agent data.
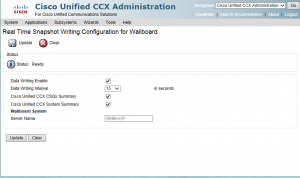
- Also on your UCCX server, go to Tools > Real Time Snapshot Config and enable the “Data Writing Enable”, “ICD CSQs Summary”, “ICD System Summary”, and set the Data writing to whatever you like.
- Now you’ll need to download and install the IBM Informix database drivers. You can find them here: ciscounitytools.com. I used the 4.10 version. Please note the extra hoops you’ll need to jump through to install this on Windows 64bit. I installed all features except the OpenAdmin Tool
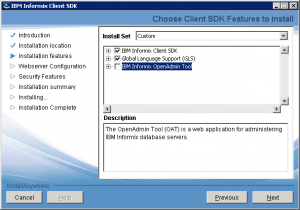
- Now it’s time to configure the ODBC connection on your windows box.
- Launch the ODBC Datasource Administrator (Start -> Administrative Tools -> Data Sources (ODBC)
- Click the System DSN tab
- hit ADD
- Choose IBM Informix ODBC Driver
- Finish
- For Datasource name enter UCCX (you could pick anything you’d like)
- on the connection tab, enter the following
- Server Name – the name of your server with _uccx appended
- Convert all uppercase characters to lowercase characters
- Replace all hyphens with underscores
- If the host name starts with a number, add the prefix i
- Append _uccx to the server name
- For example, if your host name is 123-UCCX-1, your instance name will be i123_uccx_1_uccx
- Host Name – enter the DNS host name of your UCCX server (make sure the Windows server can ping this box – if not then you may need to add an entry in your hosts file for the name resolution).
- Service – 1504
- Protocol – onsoctop
- Database Name – db_cra
- User Id – uccxwallboard
- Password – the password from step 5
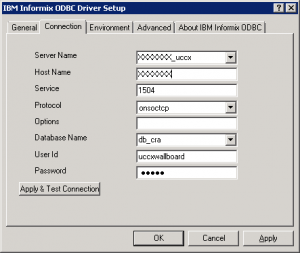
- Server Name – the name of your server with _uccx appended
- Click the apply button
- On the Environment tab set the Client and Database locales to en_US.UTF8
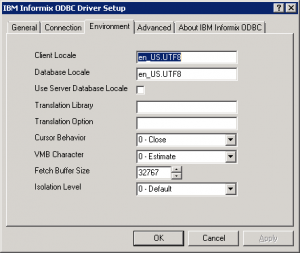
- You should now be able to go back to the connection tab and hit “apply & test connection”, and have the test succeed.
- Finally, we’ll need to edit the parameters.cfg file that is currently in the wwwroot folder.
Configuring the parameters.cfg file
There are a ton of options in the parameters.cfg file, but luckily, there aren’t too many that have to be changed. The file is well commented, so you should be able to figure it out. Here are the highlights:
- ServerURL = the url to your windows server that hosts your file. include the full url with trailing /
- DBsource = the IP address of your primary UCCX server
- DBServer = the Server Name of your UCCX server from step 7.1 above
- DBuserID and DBpass = the credentials for your wallboard user.
- DSN = the name of your DSN connection from step 6 above
- OnlyOneQueue = if you have only 1 CSQ then set this to 1. this will cause the page to display taller, but will only show one CSQ
That should get you started. You’ll notice that there is a good bit of coding in the script for agent data and stats. It is not possible to use this to pull agent stats using the uccxwallboard user. if you want to go against Cisco recommendations and use the uccxhruser, you can change the DisplayAgentsStatsTrue to 1, and pull information about agents. I don’t do this on my production server.
Required files (you only need the latest version):
Agent status using the Finesse desktop by Lucas Marcel
Lucas added some code to show the status of individual agents without using the unsupported uccxhruser. This only works if you are using the finesse desktop and uses the ‘User – Get List‘ (https://developer.cisco.com/site/finesse/docs/#userget-list) finesse API which returns the current state of the agents in a XML file. It won’t give you user stats so it’s not a replacement for using uccxhruser.
Test that the API is working for you by browsing to:
http://:8082/finesse/api/Users
or
https://:8445/finesse/api/Users
Below is the code added to generate a basic table with two columns: Agent (showing the agent first and last name) and State (shows READY, NOT_READY, TALKING, etc.). I am filtering on the team name to show only a subset of agents. You will need to replace “https://nctdgao-cuccx1:8445/finesse/api/Users/”, “admin_user”, and “admin_password” with what makes sense in your environment.
Dim objRequest, objXMLDoc, objXmlUsers
Dim user, user_property
Dim node_firstname, node_lastname, node_state

Set objRequest = Server.createobject("MSXML2.ServerXMLHTTP")

With objRequest
.SetOption 2, objRequest.GetOption(2) - SXH_SERVER_CERT_IGNORE_ALL_SERVER_ERRORS
.open "GET", "https://nctdgao-cuccx1:8445/finesse/api/Users/", false, "admin_user", "admin_password"
.send("")
End With

Set objXMLDoc = Server.createobject("MSXML2.DOMDocument")
objXMLDoc.Load(objRequest.ResponseXML)

Set objXmlUsers = objXMLDoc.getElementsByTagName("User")

Response.Write("AgentState")

For Each user In objXmlUsers
For Each user_property In user.ChildNodes
If (StrComp(user_property.nodeName,"teamName") = 0) AND (StrComp(user_property.text, "name_of_your_team") = 0) Then
Set node_firstname = user_property.parentNode.getElementsByTagName("firstName")
Set node_lastname = user_property.parentNode.getElementsByTagName("lastName")
Set node_state = user_property.parentNode.getElementsByTagName("state")

Response.Write("" & node_firstname.item(0).Text & " " & node_lastname.item(0).Text & "" & node_state.item(0).Text & "")
End If

Next
Next

Response.Write("")
Support
Looking for support? Please go to the UC Guru support forum

For Support, please go to the UC Guru support forum. I’m disabling comments in order to provide better support.
Will this wallboard support UCCX 11.X also…please help confirm
It is running on UCCX 11.5.1.10000-61
Did you get an answer or information about UCCX 11.?
Just testing this for replies.
This is BLOCK QUOTE
and this is CODE
If DisplayCSQcallsWaiting = 1 ThenResponse.Write ""
Response.Write "" & TableColumnHeader_CSQStats_Column5 & " "
Response.Write "" & objRS("callsWaiting") & ""
Response.Write ""
End If
So, neither of those allow brackets…
I am using 32 Bit server and I fixed this error;
Microsoft OLE DB Provider for ODBC Drivers error ‘80004005’
[Microsoft][ODBC Driver Manager]Data source name not found and no default driver specified.
Using the following method;
Under IIS setting > Application Pools > DefaultAppPool > Advanced settings > Enable 32 Bit applications: Set to True.
Thanks and good luck.
Great Wall board!
Anyone got it working on Server 2016?
Running UCCX 10.5 but keep getting the ASP error.
Have all ASP and related services installed and have rebooted the box
Any ideas?
Well… Yes, First you have to enable ASP. In Server Manager select “Manage” from the upper-right corner of the window, then select “Add Roles and Features”
Click next until you reach Server Role, look for “Web Server (IIS)” > “Web Server” > “Application Development”, finally, select ASP and ISAPI Extensions.
That’s step one, for step two, you must open the IIS Manager, look for the Application Pools and right-click the “DefaultAppPool”, select “Advanced Settings”. The second option in the new window says “Enable 32-Bit Applications”, set that to TRUE.
And that’s all!
Is there a way to display SLA?
First off, thank you very much for creating such an amazing wallboard.
I was wondering if anyone’s managed to get average Service Level Percentage or even service level percentage to show up for each CSQ. If not, can anyone offer hints/tips on where to get started. Fairly new to ASP.
Thanks